
I’m getting more and more interested in how my system works “under the hood” lately. These fundations are essential to understand some behaviors / technical choices in technologies oriented for end users (such as Docker).
That’s why I decided to write, mostly as a reminder for myself, a serie of articles explaining some fundamental Linux mechanisms. As I have to start somewhere, I’ll start with the boot process.
Disclaimer: I will assume the machine is running with BIOS and Grub as bootloader. If you would like to have explanation for other type of configuration, with UEFI for instance, please let a comment to request such article.
Power on : BIOS POST execution
When you switch on your computer, the processor doesn’t know anything about its environment. So it will executes the instruction located in a predefined memory location (FFFF:0000h in X86 based computers).
The instructions will redirect to another memory location, which is mapped to the BIOS memory.
Indeed, when booting, the processor runs in a mode called real mode. In this mode, the processor access directly the memory via addresses starting from 0 to 1MB (0xFFFFF). But this memory is not mapped entirely to the RAM memory. Some addresses are mapped to the BIOS memory, and other to the legacy video card memory.
The BIOS instructions will then be executed.
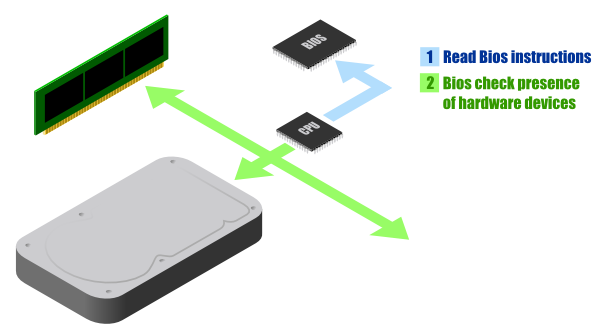
The first BIOS action is the POST (Power On Self Test). The POST will check the presence and integrity of a set of important hardware devices, and inform you if it detect defects (with a series of bip sound).
Reading the CMOS and choose the bootable device
You cannot modify the BIOS instructions by yourself (without flashing it), but in order to save some information (time, user preferences), the motherboard is shipped with a memory called CMOS.
The CMOS will contains for instance an ordered list for the bootable devices. The BIOS will check the presence of each device from this list, and also if it contains a bootable media.
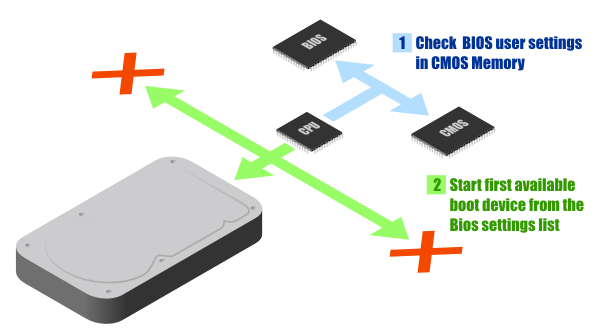
Let’s say that the bootable media is a hard drive for the rest of the explanation.
Grub stage 1
A hard drive contains a limited space in their first sector called Master Boot Record (MBR). This MBR contains only 512 Bytes. And in theses 512 Bytes must enter:
- The instructions to boot the system (446 Bytes)
- The information about the partitions of the hard drive (64 Bytes)
- A checksum to verify the integrity of the MBR, called Magic Number (2 Bytes)
The fact that the MBR is so small will lead to many difficulties: will the code to load the Linux kernel fit in this 446 Bytes? This limited size is also the reason why you can only have 4 primary partitions (4 descriptions of 16 Bytes), limited to 8GB or 2TB depending on the method they are described (CHS vs LBA).
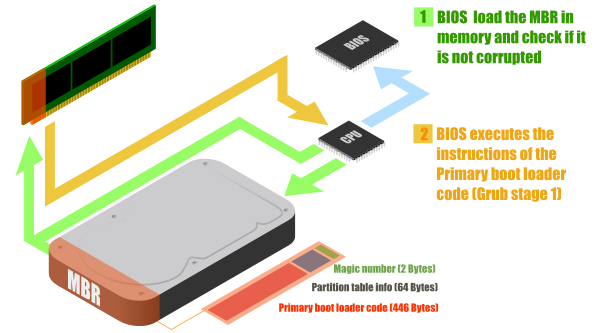
To solve that, the boot process is done in several steps. The first step will load the instructions from the 446 Bytes length primary boot loader code and execute it. This is called the Grub Stage 1. GRUB is what we called a boot loader.
Grub stage 1.5
The partitions start at sector 63. The MBR is written in sector 0. This area between the MBR and the beginning of partitions is called MBR GAP. GRUB uses this space to put some extra code in it.
The code in GRUB stage 1, doesn’t know how to read a Linux partition, and as a consequence load the kernel image that is inside. That’s why the GRUB stage 1 load the content of the MBR GAP, which contains instructions for opening a Linux partition.

The execution of the code of the MBR GAP is called Grub stage 1.5.
Grub stage 2
But a part of the Grub configuration is modified by the user in configuration files located inside the Linux partition. That’s why Grub stage 1.5 needs to open the partition (the one that is called active) and read the file /boot/grub/grub.cnf.
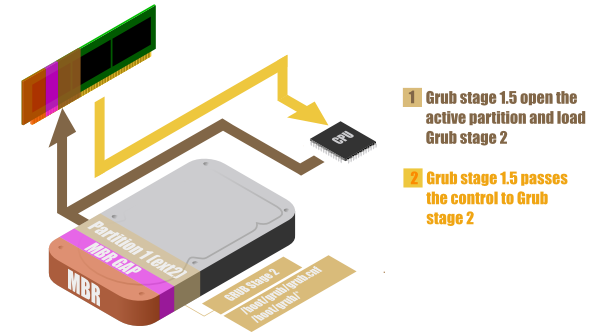
When this is done, the Grub is in stage 2, and can prompt an interface to let the user make choices (such as choosing which kernel to load or add boot options parameters).
Kernel Boot execution
The Linux kernels are located in the /boot folder, and have name such as vmlinuz-x.xx.x-xx-[...]. These kernels are compressed files, that contains a generic core Linux kernel (if you didn’t build it yourself). As this kernels have been generated by other people, who don’t know the specificity of your configuration, some modules (as drivers) can be missing.
That’s why you can also find in the /boot folder image called initrd.img-x.xx.x-xx-[...]. An initrd file is a temporary file-system that will be mounted during the boot process, and that will load the missing modules in the kernel. It allows to keep the kernel images small and to load dynamically only what is needed.
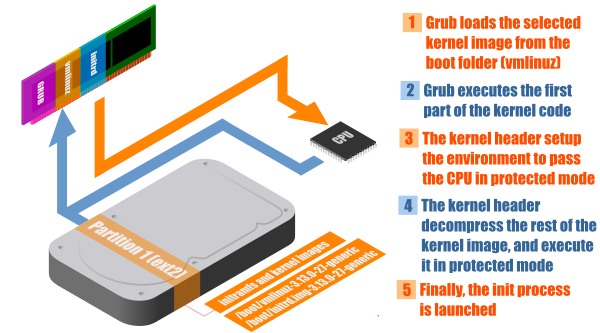
The vmlinuz files are executables files, that are actually composed of different chunks (bootsect.o + setup.o + misc.o + piggy.o). The piggy.o contains the gzipped vmlinux file. The processor is still in real mode which mean it can only address a memory area of 1 MB. The problem is that the compressed image is bigger than 1 MB. That’s why the property of bzImage that allows to split the image in discontinuous area is convenient here. The piggy.o chunk is loaded outside the 1MB area zone (by switching the processor to protected mode), and the bootsect.o, setup.o, and misc.o will be load in the real mode map area.
The bootsect.o contains a legacy code that is now ignored (used to be the bootloader code for the MBR), and setup.o and misc.o initialize some variables and configuration (memory, video). After that the CPU pass into protected mode.
In protected mode, the CPU can address up to 4GB of memory, and can finally execute the decompress_kernel() instruction, that will uncompress the kernel image and mount the system layout, for finally launch the init process.
The init process is the first process launched in user space, and has the responsibility to launch all other needed services.
Historically, it was the SysVinit that did this job, but some distribution use Upstart, or the new Systemd. All these solutions work really differently (and would deserve a dedicated article), but they all get the same job done: launching all other needed user processes to start the system.
Sources
I based my understanding of the boot process from these great articles:
- The Master Boot Record by Dewassoc
- Linux Booting Process by Slashroot
- Kernel Boot Process by Gustavo Duarte
And also thanks to many articles of Wikipedia and answers of the Unix and Linux StackExchange community.
For any opinion, correction or question, feel free to comment!