A week ago, I introduced the framework Docker. Docker is a lightview virtualized environment. It allows to build, manage and run containers to easily deploy an app in an iso environment. I will introduce today how to create containers interactively and through Dockerfile.
Hands on containers and images
If you’re not familiar with Docker, I strongly recommend you to have a look to their interactive tutorial. It is well done, efficient, and get you into the swing of things. The Dockerfile tutorial will also give you all the basis. I will try here to sum up the more important concepts.
What is a container?
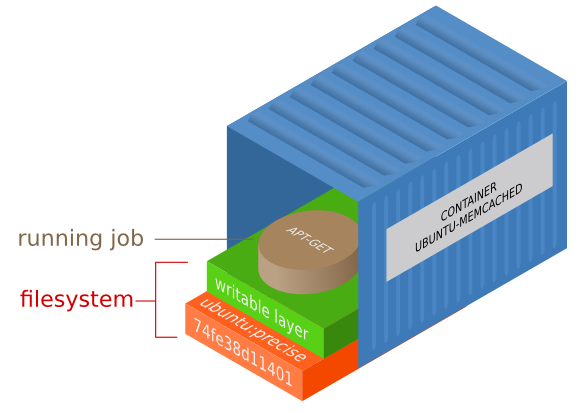
A container can be represented by two main components:
- A running job
- A filesystem modified by the job
The filesystem itself is a multilayered union filesystem, with the top layer saving the current modifications, and the underlying layers read only images. Let’s have a deeper look on what is a multilayered union filesystem.
Images and AUFS
Let’s build our own customized image! First of all, let’s pull an image from the docker index.
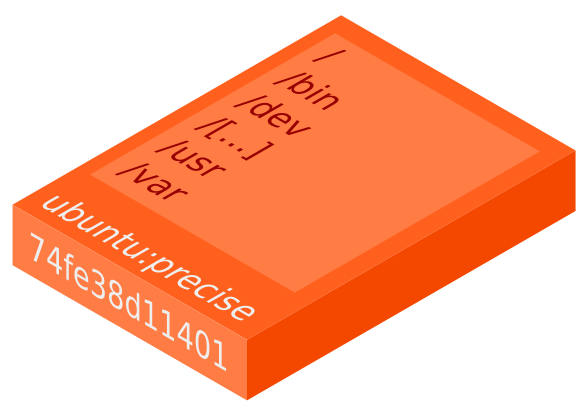
~$ sudo docker pull ubuntu:preciseThis will download an image with the files of Ubuntu Precise distribution (without the Kernel, as it uses the host kernel).
You can have information about downloaded images with the command docker images:
$ sudo docker images
REPOSITORY           TAG                 IMAGE ID            CREATED             VIRTUAL SIZE
ubuntu               precise             74fe38d11401        3 weeks ago         209.6 MB
We will then interact with it by launching a job from this filesystem.
~$ sudo docker run ubuntu:precise apt-get install -y memcached
[...]
When executing this command, we create a container. This container will create a writable layer for its filesystem, and base it upon the image ubuntu:precise. It will then launch the process apt-get with the argument install -y memcached
I didn’t affect any name to the container in the previous command. To find the id of a running container, you can type the command docker ps:
~$ sudo docker ps
CONTAINER ID        IMAGE               COMMAND                CREATED              STATUS              PORTS               NAMES
Here, I don’t have any running container. Indeed, the status of the container is related to the status of its running job. As a consequence, once apt-get install -y memcached returned, the container is stopped.
To display all containers currently on your machine, you can type docker ps -a:
~$ sudo docker ps -a
CONTAINER ID        IMAGE               COMMAND                CREATED              STATUS              PORTS               NAMES
cab24787db86        ubuntu:12.04        apt-get install -y m   About a minute ago   Exit 0                                  clever_curie
I can now commit the content of the filesystem of this container into a new image:
~$ sudo docker commit cab24
9f97edd4e9ee794eca4c40db3122b5c635f0e2f92c3b0e62deaac9e28af1a868
You will note that typing just the first digits of the id is enough to find it, as in git.
You image is now visible when you display your docker images:
~$ sudo docker images
REPOSITORY           TAG                 IMAGE ID            CREATED             VIRTUAL SIZE
<none>               <none>              9f97edd4e9ee        3 minutes ago       246.2 MB
ubuntu               precise             74fe38d11401        3 weeks ago         209.6 MB
You can run a new container based on this new image:
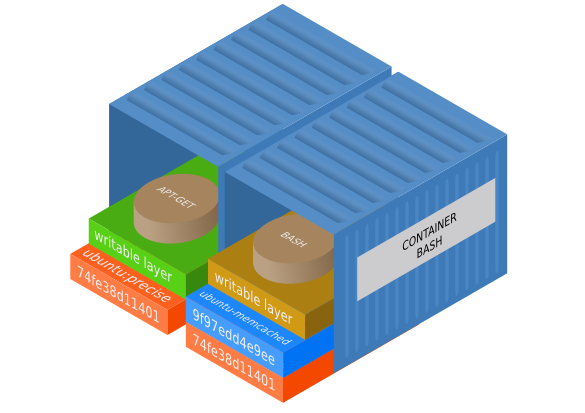
~$ sudo docker run --name "bash-on-mysql-image" -i -t 9f97ed /bin/bash
root@1ddbe7cefb87:/#
You will now run a new container, with the process /bin/bash, -i and -t options for respectively running it interactively and attaching a pseudo tty, --name to name our container, that will put a writable layer upon our image 9f97edd, which is itself based on our images ubuntu:precise.
You may have understand now that referencing the images by their id won’t be handy, That’s why you will prefer to organize your images under
If you want to organize your images, it is better to commit them under your local repository. You could have run this command to commit from the container:
~$ sudo docker commit 9f97e yabage/ubuntu-memcachedOr you can tag the current image directly
~$ sudo docker tag 9f97e yabage/ubuntu-memcachedThe Dockerfile
You have seen how to build an image by interacting directly with the container. Nevertheless, most of the time you will want to share your images through “recipes” allowing others to build themselves your images. This is what Dockerfiles are for.
The Dockerfile lists the instruction on how to build your image and what to run on the container.
As you want to obtain the same image in every circumstances, you will have to avoid any operation that doesn’t result in a controlled and guaranted state. For instance, you should not do any apt-get upgrade in a Dockerfile, as you don’t controlled the result : indeed, depending the date your launching it, the upgrade could be different. Moreover, for technical reasons, there is a high chance that the upgrade fails. If you want to upgrade your distribution, you should update the base image your Dockerfile rely on.
Now let’s see how to build the first container in a Dockerfile:
FROM ubuntu:precise #the base image of this build script

RUN apt-get install -y memcached
Well…that’s all. You know have a container with memcached installed.
I kept this Dockerfile minimalistic on purpose, but you will want to define the maintainer of the Dockerfile with the tag MAINTAINER, define the default process to launch with CMD and a lot of other useful instructions.
For now I will stick to this version.
I would like to focus your attention on a point: each RUN instruction will commit the current layer and create a new one upon it. The state of the memory is forgotten between two RUN instructions. Only the filesystem is kept.
To build an image, you put these instructions in a file called Dockerfile, then execute the build command from the same folder:
sudo docker build .It will build the container and return its id. If you want to name the container when building, you can do it with the -t option
sudo docker build -t ubuntu-memcached .You have seen a very quick introduction to Dockerfile. I will soon write an article about how to write a proper Docker image, following good practices, so that you can share them with your friends and the community!